DIY leach field: what you can legally build, and what will get you fined
By the SepticMind Editorial Team
TL;DR
- Building your own leach field is legal in roughly half of U.S.
- states if you own and occupy the home, but every state requires a permit, a licensed soil evaluation or perc test, and an approved design.
- Skip those steps and you face fines from $500 to $10,000-plus, mandatory removal, and a lien on your property.
- The labor you can save runs $2,000 to $6,000.
What is a leach field and how does it actually work?
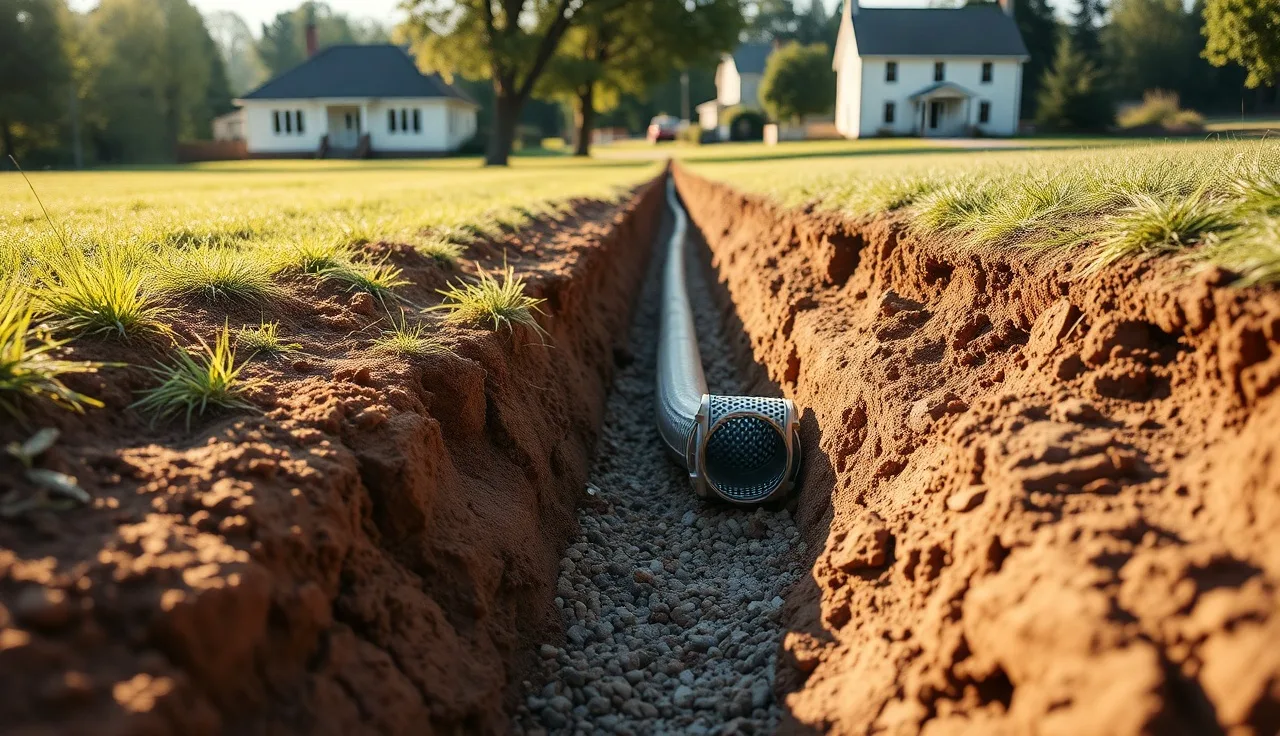
A leach field (also called a drain field or absorption field) takes the liquid effluent from your septic tank and spreads it into the soil, where bacteria and the soil itself filter out pathogens and nutrients before the water rejoins the groundwater. [1]
Here's the sequence. Wastewater flows from your house into the septic tank. Solids settle to the bottom as sludge, grease floats to the top as scum, and the clarified liquid in the middle (effluent) flows out through an outlet baffle into a distribution box or straight into perforated pipes buried in gravel-filled trenches. Those trenches are the leach field. Effluent seeps out of the pipes, drains through the gravel, then moves down through 18 to 36 inches of native soil before reaching the water table. [1]
The soil does the real treatment. A thin layer of microbial activity called the bio-mat forms at the gravel-soil interface and removes most of the remaining pathogens. Overload the system with too much water or too many solids and that bio-mat gets swamped. The field fails.
Understand this before you touch a shovel. Leach field design is not about digging trenches wherever there's open yard. It's about matching hydraulic load to soil absorption capacity, holding setbacks from wells and property lines, and keeping enough soil depth above the water table to treat the effluent before it gets there. Get any of those wrong and you have a public health problem, not a plumbing problem. See the leach field overview for a deeper look at system types.
Is it legal to build your own leach field without a contractor?
It depends entirely on your state, and sometimes your county. No federal rule governs who can install a leach field. The EPA sets guidelines and best practices through its SepticSmart program, but onsite wastewater regulation is almost entirely a state and local matter. [2]
About half of U.S. states let owner-builders install their own septic systems, leach field included, as long as they pull the required permit, pass the required inspections, and follow the state's design standards. Texas, Tennessee, and Georgia have historically allowed this. [8][10] Other states, including California, New York, and most of New England, require a licensed contractor or certified installer for the actual work, even if you own the property. [3]
Even in permissive states, the design usually has to be done or reviewed by a licensed professional. A registered sanitarian, licensed engineer, or certified soil scientist typically signs off on the perc test results and the system layout before a permit is issued. That review is not optional, and you can't skip it by calling the project DIY.
Start here. Call your county health department or environmental health department (not the building department, though you may need them too) and ask two questions. Does the state or county allow owner-installation of septic systems? What certifications or professional sign-offs are required at each stage? Get the answers in writing, or at least get the name of the person you spoke with.
If your state requires a licensed contractor for installation, a partial DIY approach still works. Plenty of homeowners do the excavation and backfill themselves, hire the licensed installer only for the regulated steps, and save real money. Check your local code before assuming it's off the table. The cost to install a septic system article breaks down which line items contractors mark up most.
What permits and soil tests do you need before you dig anything?
Permits first, everything else second. Pulling a permit isn't box-checking. The permit process is how the county reviews your soil test, checks your setbacks, and approves your design. Without it, the system is unpermitted, often illegal to operate, and a serious liability when you sell. Title companies and buyers' inspectors always look for septic permits. [4]
The typical permit sequence for a leach field looks like this:
- Site evaluation and soil testing. A perc test (percolation test) or a more detailed soil morphology evaluation is done by a licensed professional in most states. The perc test measures how fast water drains from a test hole, in minutes per inch (MPI). Soil morphology evaluation goes further, examining soil color, texture, and mottling to find the depth to the seasonal high water table and the limiting layer. Many states have moved past perc tests alone toward full soil morphology because perc tests can be gamed by timing or weather. [5]
- System design. Based on the soil test and your home's bedroom count (bedrooms set design flow in most state codes, typically 110 to 150 gallons per bedroom per day), an approved design is prepared. Most codes spell out trench width, depth, pipe diameter, gravel depth, and minimum separation distances to wells, property lines, surface water, and buildings.
- Permit application. The design, soil test, site plan, and fee (typically $150 to $600, varying widely by county) go to the health department. Review takes days to months depending on the jurisdiction.
- Installation with inspections. The county inspector usually wants to see the trenches before gravel goes in, the pipe layout and slope before backfill, and sometimes a final inspection after backfill. Miss an inspection and you're uncovering the work.
Skip any of these steps and you can end up with a cease-and-desist from the health department and an order to dig everything up and start over, on your dime. That outcome costs far more than the professional fees you were trying to dodge. [2]
How do you size a leach field correctly?
Sizing a leach field comes down to two numbers: design flow (how much wastewater your house makes per day) and soil application rate (how much of that the soil absorbs per square foot per day). Divide design flow by soil application rate and you get the minimum trench bottom area. Then your state code tells you how to turn that area into actual trench dimensions. [5]
Design flow almost always comes from bedroom count, not actual occupancy, because codes have to plan for future use. A common standard is 120 gallons per bedroom per day, so a 3-bedroom house has a design flow of 360 gallons per day. Some codes use higher numbers for older homes or larger bathrooms.
Soil application rate comes from the perc test or soil evaluation. This table shows how hard soil type drives field size:
| Perc rate (min/inch) | Soil type | Max application rate (gal/sq ft/day) | Trench bottom area needed for 360 gpd |
|---|---|---|---|
| 1-5 | Coarse sand/gravel | 1.2 | 300 sq ft |
| 6-15 | Sandy loam | 0.8 | 450 sq ft |
| 16-30 | Loam | 0.5 | 720 sq ft |
| 31-60 | Clay loam | 0.2 | 1,800 sq ft |
| >60 | Heavy clay | Not suitable | Conventional system not allowed |
Source: EPA Onsite Wastewater Treatment Systems Manual, 2002 [5]
Most codes also require a reserve area, typically 50 to 100 percent of the primary field area, kept clear so a replacement field can go in without a variance. If your lot can't fit both the primary field and the reserve area, you may not get a permit for a conventional system at all.
Trench dimensions are usually set by code: 12 to 36 inches wide, 18 to 36 inches deep, with perforated pipe on 6 inches of gravel and 2 to 6 inches of gravel above the pipe before a filter fabric and topsoil layer. Total trench length is total area divided by trench width. A 720 sq ft requirement in 24-inch (2-foot) wide trenches means 360 linear feet of trench, usually split into parallel runs with a maximum single run of 60 to 100 feet depending on code. [5]
What materials do you need for a DIY leach field?
The material list for a conventional gravity-fed leach field is short, but the spec matters. Wrong gravel size or wrong pipe fails an inspection.
Perforated pipe. Schedule 40 PVC perforated pipe is the modern standard, usually 4-inch diameter. Some codes still allow corrugated polyethylene (the black flexible stuff), but check your local code because some jurisdictions have dropped it over long-term performance concerns. Perforations face down in the trench (counterintuitive, but correct, and it prevents clogging).
Washed drain rock (gravel). The EPA and most state codes call for clean, washed aggregate in the 3/4 inch to 2.5 inch range. Fines (small particles) in the gravel plug the void spaces and cut absorption. Do not use crushed limestone or any stone that carries fines. Most codes want 6 inches of gravel below the pipe and 2 to 4 inches above it. [5]
Distribution box (D-box). A concrete or plastic box splits effluent flow evenly between the field laterals. Some states allow equalizing headers instead, but a proper D-box is the standard and runs $50 to $150.
Filter fabric (geotextile). A single layer of non-woven geotextile goes over the gravel before backfill to keep soil out of the gravel layer. It's cheap (around $0.10 to $0.20 per sq ft) and it matters. Don't skip it.
Inspection ports. Many codes now require an inspection port (a capped vertical pipe) at the end of each lateral so an inspector can check water levels without digging. Cheap, easy to add.
Septic tank effluent screen. Not part of the leach field, but a companion worth having: an effluent filter on the tank outlet baffle cuts the solids load on your field and extends its life. If you're already in there, add one.
Typical material costs for a 3-bedroom conventional field in good soil: gravel $800 to $2,000 depending on haul distance, pipe $100 to $300, D-box $100, geotextile $150 to $400, fittings and incidentals $200. Materials land in the $1,500 to $3,000 range. That's before equipment rental or soil testing fees.
How do you actually install a leach field step by step?
This assumes you have a permit in hand, an approved design, and scheduled inspections. Don't start digging without all three.
Step 1: Mark the layout. Use your approved site plan to stake out the trench lines, D-box location, and setbacks. Spray paint on the ground works. Have someone double-check your measurements against the plan before any machine touches soil.
Step 2: Call 811. This is the national call-before-you-dig number. It's free, required by law in all 50 states, and it marks underground utilities. Do it at least 3 business days before excavation. [6]
Step 3: Excavate trenches. A mini-excavator or track skid steer with a trenching bucket is the right tool. Hand-digging 360 linear feet of 30-inch trench is possible and something you will regret. Mini-excavator rental runs $300 to $600 per day, and an experienced operator can cut a 3-bedroom field in 4 to 8 hours. The detail that matters: excavate to design depth on a 1/8 inch per foot slope (toward the end of each lateral, away from the D-box), checked with a laser level or transit. Too much slope and effluent shoots to the end. Too little and it pools at the start.
Step 4: Call for inspection. Most counties want to see the open trenches before anything goes in. Schedule this before you move on.
Step 5: Place gravel and pipe. Put 6 inches of washed drain rock in the trench bottom. Lay the perforated pipe on the gravel with perforations facing down, holding the 1/8 inch per foot slope. Connect laterals to the D-box. Install end caps and inspection port stubs. Add 2 to 4 inches of gravel over the pipe.
Step 6: Install geotextile. Roll filter fabric over the entire gravel surface, lapping up the trench walls a few inches. This one step separates fields that last 20 years from fields that fail in 5.
Step 7: Call for inspection. Most codes require inspection before backfill. This is the one you cannot miss. If the inspector finds a problem, you fix it and call them back. Backfill before inspection and you may be uncovering everything.
Step 8: Backfill. Use the excavated native soil, keeping out large rocks and construction debris. Don't compact heavily over the trenches. You want the soil to settle naturally, and you don't want to crush the pipe. Final grade should slope away from the field for surface drainage.
Step 9: Connect to the tank. Install the inlet pipe from the septic tank to the D-box per your design. This is usually 4-inch solid PVC sloped at 1/8 to 1/4 inch per foot. If the existing tank outlet elevation doesn't work with your design, that's a design problem that should have surfaced at the permit stage.
Step 10: Final inspection and as-built drawing. Most jurisdictions require a final inspection and an as-built drawing showing the true installed location of every component, which gets recorded with the county. Keep a copy. You'll need it when you sell or when you need repairs. If you're keeping records digitally, septic management tools like SepticMind store inspection records and maintenance history in one place.
What does a DIY leach field cost compared to hiring a contractor?
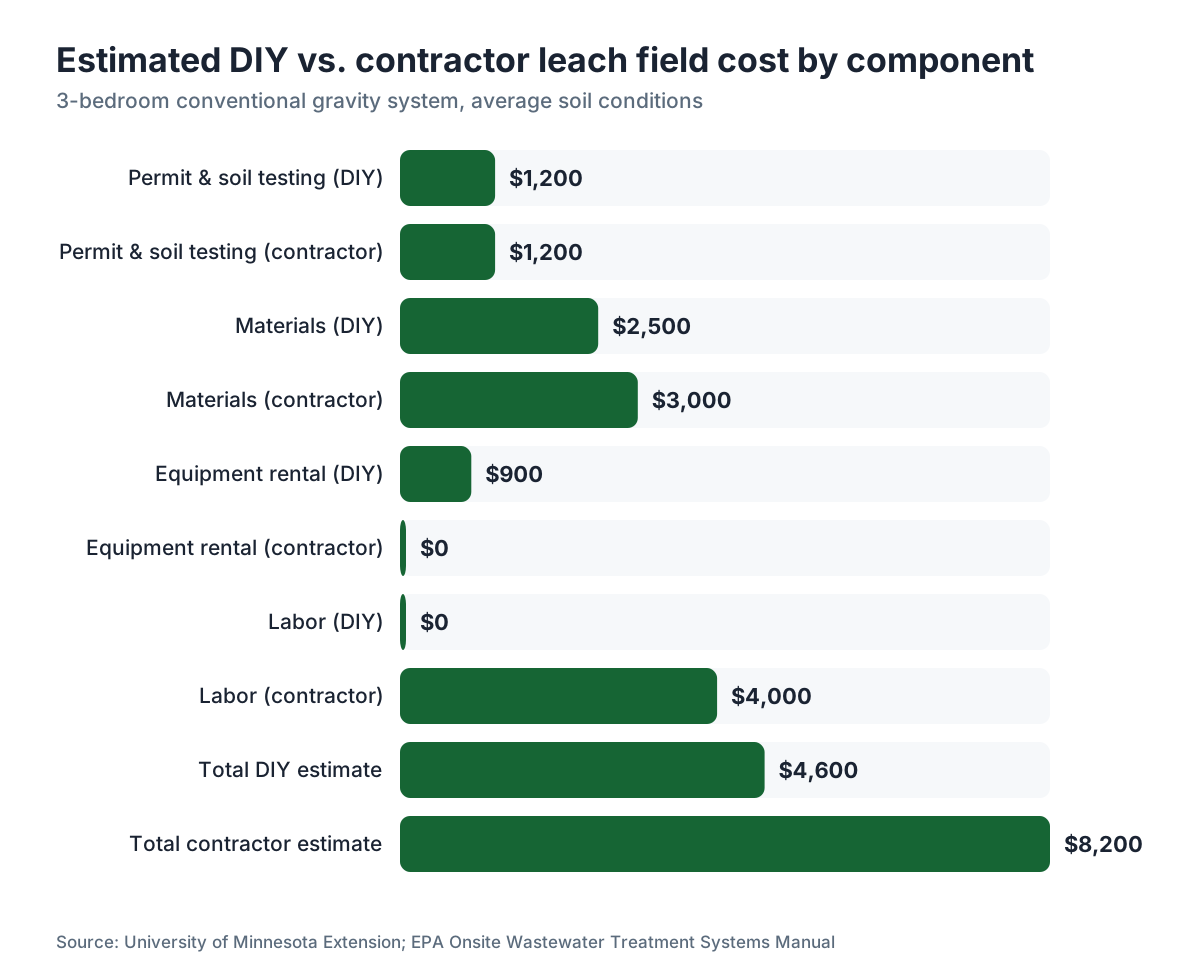
The range is wide enough to be nearly useless without your soil type, lot conditions, and local market. But here are real numbers to anchor your planning.
A professionally installed conventional leach field for a 3-bedroom home typically costs $3,000 to $15,000 total, with $5,000 to $8,000 being the most common range in average soil, according to contractor pricing surveys and state extension data. [7] Hard conditions (clay soil that forces a mound system, deep rock that needs blasting, long haul distance for materials) can push that past $20,000.
A DIY install of the same system in a permissive state might cost:
| Cost category | Typical range |
|---|---|
| Permit fee | $150 to $600 |
| Soil evaluation / perc test (professional required) | $300 to $800 |
| Design review / engineer sign-off | $200 to $600 |
| Materials (gravel, pipe, D-box, fabric) | $1,500 to $3,500 |
| Equipment rental (excavator, laser level) | $400 to $1,200 |
| Topsoil/seed for final grade | $100 to $400 |
| Total DIY estimated | $2,650 to $7,100 |
Labor savings over a full contractor install runs roughly $2,000 to $6,000 in most markets. That's real money. It comes with a real time cost (figure 2 to 4 days of physical work for an organized DIYer), the risk of failed inspections and rework, and no warranty.
One common mistake: people budget materials and forget equipment. You can't properly grade and lay pipe without a laser level or transit. Renting both a mini-excavator and a laser level for two days adds $700 to $1,500. Budget for it.
If your state requires a licensed installer, the hybrid approach (DIY excavation and backfill, licensed contractor for the regulated steps) might save $1,000 to $3,000 while keeping you inside the code. Ask your county if that arrangement is allowed before you plan around it. For the full system picture, see the cost to put in a septic tank guide.
What are the most common DIY leach field mistakes that cause failures?
These are the failure modes that show up over and over in health department complaint records and county inspection rejections. Almost all of them are avoidable.
Wrong depth to the seasonal high water table. State codes require minimum vertical separation between the trench bottom and the seasonal high water table, typically 24 to 36 inches. Install trenches where a professional evaluation would have flagged a limiting layer too close to the surface, and the system saturates during wet seasons and surface sewage appears. It's also a permit violation, because a proper evaluation would have called the site unsuitable for a conventional field.
Insufficient slope or no slope. Gravity systems depend on consistent fall along the pipe. Zero slope leaves standing water and uneven distribution. Too much slope (more than 1/2 inch per foot) pushes effluent to the far end only. Most of these failures happen because people eyeball the slope instead of using a level.
Wrong gravel. Using crusher run, pea gravel, or any aggregate with fines is the most common material mistake. Fines migrate into void spaces, cut permeability, and can grow a bio-mat inside the gravel layer instead of at the soil interface. The field clogs early. Washed stone in the 3/4 to 2.5 inch range is specified for a reason.
Skipping the geotextile fabric. Without filter fabric, native soil works down into the gravel during rain and wetting cycles. Over years, the gravel loses void space and the field's hydraulic capacity drops.
Overloading the system immediately. A new leach field takes weeks to months to stabilize the bio-mat and set drainage patterns. Running high loads through it during that window (multiple laundry loads daily, filling and draining a hot tub) can swamp it before it's established.
Not protecting the field from vehicle traffic. One pass with a loaded dump truck over a leach field can crush pipes and compact the gravel, killing the void space that makes the system work. Mark the field boundaries permanently and enforce the no-drive rule with physical barriers if you have to.
Missing the reserve area requirement. Install the field correctly, then build or pave over the designated reserve area, and you've killed the option for a future replacement field on the same lot. That can make a future failure brutally expensive, or in some jurisdictions block a repair permit entirely. The septic system repair guide covers what happens when fields fail and what the repair options look like.
When can't you use a conventional leach field, and what are the alternatives?
A conventional gravity leach field works only when soil, lot size, and site geometry line up. When they don't, you need an alternative system, and alternative systems are almost never DIY-friendly.
You typically can't use a conventional field when:
- Perc rate is too slow. Soils that take more than 60 minutes per inch to absorb water lack the hydraulic conductivity for a standard field. Clay-heavy soils across much of the Midwest and Southeast run into this.
- Seasonal high water table is too shallow. If groundwater comes within 24 to 36 inches of the surface during wet seasons, you don't have enough treatment depth.
- Lot is too small. With no room for the primary field plus the required reserve area, a conventional system won't fit.
- Setbacks can't be met. Wells, property lines, surface water, foundations, and driveways all carry minimum separations (typically 50 to 100 feet from a well, 5 to 25 feet from property lines, varies by state). On a tight lot, these can make a conventional field geometrically impossible.
Alternatives include mound systems (effluent pumped into an elevated sand bed above grade), drip irrigation systems (low-pressure dosing through small-diameter tubing), aerobic treatment units (ATUs, which treat effluent to a higher standard before dispersal), and constructed wetlands. Every one of these needs more professional design, more specialized equipment, and usually more ongoing maintenance than a conventional field. None are realistic DIY projects. [11]
A mound system in tough soil can cost $10,000 to $30,000 installed, which reframes the DIY savings math fast. If your site can't support a conventional field, the permit process tells you that before you dig. That's exactly why the permit process exists. [3]
How do you maintain a leach field after installation?
A well-installed leach field should last 20 to 30 years with proper maintenance. Most early failures trace to two causes: hydraulic overload and solids carryover from an under-pumped or failing septic tank.
The single most important task is pumping the septic tank on schedule. The EPA recommends pumping every 3 to 5 years for a typical household, and the real interval depends on household size and tank volume. [2] A tank left to fill with sludge passes solids into the leach field, where they clog the bio-mat and gravel for good. Once solids have thoroughly clogged the gravel and soil interface, no leach field fully recovers. The field gets replaced. See how often to pump septic tank for a full sizing and interval guide.
Beyond pumping, the rules are simple. Don't run garbage disposal waste into the system (it roughly doubles the solids load). Don't flush anything that isn't toilet paper. Don't park or store on the field. Don't plant trees or large shrubs near it (roots seek water and will find perforated pipe). Do plant shallow-rooted grass over the field to hold soil and help with evapotranspiration.
Wet spots or lush green patches over the leach field during dry weather mean effluent is surfacing. That's a failure symptom and in most states a public health violation that requires immediate reporting and repair. Don't try to fix surfacing effluent with bacteria additives or enzyme treatments. There's no solid evidence these products repair a failed field. Rest the field (cut water use hard), pump the tank, and call a licensed professional to judge whether the field can recover or needs replacement.
Tracking pump-out dates, inspection records, and repairs in one place matters more than most homeowners realize, especially since septic tank pumping history often gets requested during a sale. Septic management platforms like SepticMind are built for this record-keeping, and they're especially handy if you're a service provider managing multiple properties.
What setbacks and site rules govern leach field placement?
Setback requirements vary by state and sometimes county, but the logic is consistent: keep effluent far enough from water sources and structures to prevent contamination and structural damage. [3]
Here are common minimum setback distances. These are typical ranges, and your local code controls and may be stricter:
| Structure/feature | Typical minimum setback |
|---|---|
| Drinking water well (private) | 50 to 100 feet |
| Public water supply well | 100 to 200 feet |
| Property line | 5 to 25 feet |
| Buildings and foundations | 5 to 20 feet |
| Streams, lakes, wetlands | 25 to 100 feet |
| Driveways and parking areas | 5 to 10 feet |
| Water service lines | 10 feet |
| Irrigation ditches | 25 to 50 feet |
The well setback catches most DIYers off guard on rural lots. A 100-foot radius from a well eats up a lot of a small parcel. If a neighbor's well sits near your property line, that well's setback can reach onto your property and constrain your field placement as much as your own well does. Many states require setbacks from neighboring wells too.
Elevation matters as much as horizontal distance. Codes typically want the leach field downhill from any well or water source where possible, because groundwater flows with topography. Placing a field upgradient from a well is a red flag most inspectors catch during permit review.
Flood zone placement is its own issue. Leach fields in FEMA-mapped flood zones face extra restrictions because floodwater saturates the field, can force sewage surfacing, and contaminates floodwaters. Many counties ban new leach fields in 100-year flood zones outright. [4]
Should you DIY a leach field repair or replacement instead of a new install?
A repair or replacement is harder than a new install in almost every way. The old field is already in the ground, the tank's effluent is already flowing, and you may be working in saturated or contaminated soil.
For repairs, the first question is what actually failed. A clogged inlet pipe or a broken distribution box is a manageable DIY repair if you have the skills and permits. Replacing the entire field because the bio-mat is clogged for good is a full installation project, with the added job of routing around the old field and decommissioning it properly. Most states require the old field to be filled with sand or gravel after abandonment so it doesn't become a void that captures surface water.
Resting a failed field (shutting it down and routing flow to a new field or an emergency holding tank) sometimes allows partial recovery. The EPA notes that rest periods of 1 to 3 years have helped some fields recover enough hydraulic function to return to limited service, but recovery is unpredictable and hinges on whether the failure came from solids clogging or from soil-level hydraulic failure. [2]
With a partial failure, say one lateral surfacing while the others are fine, that specific lateral might be repairable. Exposing it, cleaning it, and replacing the gravel in that trench is within DIY reach if you can get a repair permit. Always call the county before starting any repair to confirm whether a permit is required. Most jurisdictions require permits for repairs, often more strictly than for new installations.
For the range of repair options and costs, the septic system repair and septic tank repair articles cover the full spectrum. If the problem is the tank rather than the field, septic tank inspection is the right place to start.
Frequently asked questions
Can I install a leach field myself without a permit?
No. Every U.S. state requires a permit for leach field installation, even where owner-builder installation is allowed. Installing without a permit means the system is illegal to operate, creates liability when you sell, and can bring fines from $500 to $10,000-plus plus a mandatory removal order. The permit process is also how you confirm the site can actually support a conventional field before you spend on labor and materials.
How long does it take to install a DIY leach field?
The physical install for a 3-bedroom conventional field takes most DIYers 2 to 4 days with an excavator. The full timeline from perc test to final inspection is typically 4 to 12 weeks, dominated by permit review. Some rural counties with backlogs take longer. Budget the time as generously as you budget the money.
What is a perc test and do I need one for a DIY leach field?
A percolation test measures how fast water drains from a test hole, in minutes per inch. You need one (or a more detailed soil morphology evaluation) in nearly every jurisdiction before a permit is issued. In most states, the perc test must be conducted or witnessed by a licensed professional, usually a sanitarian or certified soil evaluator. Some states let you dig the test holes, but a licensed evaluator has to conduct and document the test.
How many linear feet of leach field trench does a 3-bedroom house need?
It depends on soil type. In loam with a perc rate of 16 to 30 minutes per inch, a 3-bedroom house at 360 gallons per day design flow typically needs 720 square feet of trench bottom area, which works out to roughly 360 linear feet of 24-inch-wide trench. Sandy soils need less. Clay soils may not qualify for a conventional system at all.
Can I use plastic chambers instead of gravel and pipe for a DIY leach field?
Chamber systems (plastic arch-shaped units that replace the gravel bed) are approved in many states and are often easier for DIYers to handle, since there's no heavy gravel to move. They cost a bit more in materials but save on gravel delivery. Check your state code to confirm chambers are an approved alternative in your jurisdiction and whether they carry different sizing rules than gravel-and-pipe systems.
What happens if I build a leach field without following setback rules?
The health department can order you to abandon and remove the system at your expense, no matter how well it's working. Setback violations near wells are treated as public health emergencies in most states. You may also face civil liability if a neighbor's well tests positive for contamination traced to your system. Title issues will surface when you try to sell the property.
How deep should a leach field be installed?
Trench depth is typically 18 to 36 inches from the surface to the trench bottom, with the pipe sitting on 6 inches of gravel. The constraint that matters: the trench bottom must keep at least 24 to 36 inches of clearance above the seasonal high water table (the exact number varies by state). In frost-prone climates, trenches must also be deep enough that the pipe sits below the frost line or within the zone where biological activity prevents freezing.
Does DIY leach field work void any home insurance or warranty?
Homeowners policies typically exclude coverage for damage caused by unpermitted work. A DIY leach field installed with proper permits and passing inspections is treated the same as contractor work for insurance purposes. An unpermitted system that causes property damage (sewage backup, contamination) may get a claim denied. Check your policy language and disclose the DIY installation to your insurer.
Can I add to an existing leach field rather than replacing it entirely?
Sometimes, yes. Adding a new trench or series of trenches to an undersized or partially failed field is called expansion or field addition. It requires a permit, soil testing in the proposed expansion area, and meeting all current setback requirements. The new trenches usually have to sit 6 to 10 feet from the old ones. This works only if the original field failed from undersizing, not from soil failure or heavy solids loading.
What are signs that a DIY leach field installation has gone wrong?
Early warning signs include wet or soggy areas over the field during dry weather, lush green grass stripes following the trench lines, sewage odors in the yard or house, slow drains throughout the house (more than one fixture), and gurgling in drains. Any of these within the first year points to a design, installation, or soil evaluation problem that needs professional assessment before it gets worse.
Will a DIY leach field affect my property value or home sale?
A permitted, properly installed DIY leach field doesn't affect value differently than a contractor-installed one. Buyers and lenders care about permits and inspection records, not who swung the shovel. An unpermitted system is a real estate problem: many lenders won't finance a home with an unpermitted septic system, and buyers can demand removal or price cuts. Always pull permits.
How long should a properly installed leach field last?
A conventional leach field in suitable soil, sized correctly, and maintained with regular septic tank pumping should last 20 to 30 years. Some well-maintained fields have run 40-plus years. The biggest killers of field longevity are solids carryover from a neglected tank, hydraulic overload from high water use, and vehicle traffic compacting the field.
Can I plant a garden or lawn over my leach field?
Shallow-rooted grass is the ideal cover. It holds soil and helps with evapotranspiration without sending roots into the pipe zone. Vegetable gardens aren't recommended because of pathogen risk from effluent. Trees, shrubs, and deep-rooted plants should stay well clear. Most codes recommend a minimum of 10 feet between large trees and field trenches.
Sources
- EPA, How Your Septic System Works: Description of how leach fields disperse effluent into soil for treatment before it reaches groundwater
- EPA SepticSmart Program: EPA recommends pumping every 3 to 5 years; notes that rest periods of 1 to 3 years may allow partial field recovery
- National Environmental Services Center (NESC), Onsite Wastewater Treatment Systems: State-level variation in owner-builder installation rules and alternative system requirements
- FEMA, Flood Zone and Septic System Guidance: Flood zones create additional restrictions on leach field placement and permitting
- EPA, Onsite Wastewater Treatment Systems Manual (EPA/625/R-00/008): Soil application rates by perc test range, trench sizing standards, gravel specifications, and design flow methodology
- Common Ground Alliance, Call 811 Before You Dig: 811 is the national call-before-you-dig number required by law in all 50 states before excavation
- University of Minnesota Extension, Septic System Costs and Maintenance: Conventional leach field installation costs typically $3,000 to $15,000 depending on soil and site conditions
- Texas Commission on Environmental Quality (TCEQ), On-Site Sewage Facilities: Texas is among states allowing owner-builder installation of septic systems with proper permit
- Georgia Department of Public Health, On-Site Sewage Management Systems: Georgia allows homeowner installation of septic systems under the state onsite sewage management rules
- National Onsite Wastewater Recycling Association (NOWRA): Alternative systems including mound, drip, and ATU designs typically require professional design and installation
Last updated 2026-07-09