How to build a leach field: a step-by-step guide
By the SepticMind Editorial Team
TL;DR
- Building a leach field takes five steps: pass a perc test and soil evaluation, pull the required permits, excavate trenches to the right depth and width, lay perforated pipe in gravel, then cover with soil after an inspector approves the open trench.
- Most residential systems cost $3,000 to $15,000 installed.
- No permit means no legal system.
What is a leach field and how does it actually work?
A leach field (also called a drain field or soil absorption system) takes the clarified liquid leaving your septic tank and spreads it into the soil, where bacteria and filtration finish the treatment. It is not a storage pit. The soil does the real work.
Here's the flow. Household wastewater enters the septic tank, solids settle and scum floats, and the middle layer of liquid (effluent) drains through an outlet pipe to a distribution box, then spreads through perforated pipes buried in gravel-filled trenches. Effluent seeps through the gravel, percolates into the soil beneath, and microbes in that soil strip out pathogens and nutrients before the water reaches groundwater.
The EPA describes the drain field as the component where "wastewater is treated by the soil," and it makes soil type the single biggest variable in whether a system works [1]. Too tight (heavy clay) and water can't move. Too loose (coarse gravel or fractured rock) and water moves too fast for treatment. Both conditions push you toward an alternative design instead of a conventional leach field.
Understand the mechanics before you dig. Every design decision, trench depth, pipe diameter, total linear footage, setback distance, flows from what the soil can accept. Get that wrong and you'll be rebuilding in five years. Read our full primer on the leach field to understand sizing and failure patterns before you commit to a layout.
Do you need a permit to build a leach field?
Yes. Every U.S. state requires a permit for new septic construction, and most counties add a second layer of local review on top of state rules. Building without one is illegal. It exposes you to fines that can top the cost of the system, and it makes the property nearly impossible to sell. Some lenders won't close on a home with an unpermitted septic system.
The process usually involves a site plan, a soil evaluation report, and a system design prepared or reviewed by a licensed professional (a professional engineer or a licensed septic designer, depending on the state). The authority issues the permit before any excavation, then requires one or more inspections before backfilling. The inspector has to see the open trench, the pipe, the gravel, and the distribution box before you cover anything.
Timelines vary widely. In rural counties with light workloads, permits can take two to four weeks. Near wetlands, floodplains, or drinking water protection zones, environmental review can stretch the process to three to six months. Budget for that delay before you schedule an excavator.
Permit fees alone run about $150 to $1,500 depending on jurisdiction [2]. Some counties fold the soil evaluation fee into the permit; others charge separately. The cost to install a septic system guide breaks down the full budget if you want to plan ahead.
What soil tests do you need before designing a leach field?
Two tests drive everything: the percolation test (perc test) and the soil morphology evaluation. Some states require both. A few accept one or the other. Knowing what each measures helps you work with your engineer instead of just waiting on paperwork.
The perc test measures how fast water soaks into the soil. A test hole (usually 6 to 12 inches across, dug to the depth of the proposed absorption bed) gets pre-soaked, then water is added and you time how many minutes it takes the level to drop one inch. The result is minutes per inch (MPI). Most conventional designs need a perc rate between 1 MPI and 60 MPI [3]. Faster than 1 MPI (very coarse soil) means too little treatment time. Slower than 60 MPI (dense clay) means the soil won't take the daily flow at a practical trench size.
The soil morphology evaluation is done by a soil scientist or licensed evaluator who digs test pits (usually 5 to 8 feet deep) and reads the soil profile by hand and eye. They look at texture, structure, color, and mottling. Grayish-blue mottling signals seasonal high groundwater, which caps how deep you can set the trenches. Most codes require 2 to 4 feet of separation between the bottom of the trench and the seasonal high water table [3].
If your perc test fails, don't give up. Many sites that fail for a conventional system still support a mound system, drip irrigation system, or aerobic treatment unit. Those cost more, but they're real options. A licensed site evaluator can tell you which alternative fits your ground.
How do you design a leach field: sizing, layout, and setbacks
Leach field sizing starts with two numbers: the daily sewage flow from the house and the soil's long-term acceptance rate (LTAR), which comes from the perc test or soil evaluation.
Daily flow is estimated from bedroom count, not actual occupancy. Most state codes default to 100 to 150 gallons per bedroom per day [4]. A three-bedroom house typically designs to 300 to 450 gallons per day.
The LTAR tells you how many gallons per day the soil accepts per square foot of trench bottom. A soil with a perc rate of 30 MPI might have an LTAR of 0.4 to 0.5 gallons per day per square foot. Divide daily flow by the LTAR and you get the required square footage of trench bottom. For a 450-gallon-per-day design at an LTAR of 0.4 GPD/sq ft, you need about 1,125 square feet of trench bottom.
Standard trench width for conventional systems is 18 to 36 inches. At a 24-inch (2-foot) trench, 1,125 square feet of bottom takes roughly 562 linear feet of trench. Most designers split that into parallel runs of 50 to 100 feet each, with at least 6 feet of undisturbed soil between trenches (many codes require 10 feet center-to-center) [4].
Setbacks protect water supplies and neighboring properties. Typical minimums [2][4]:
| Setback target | Typical minimum distance |
|---|---|
| Water supply well (your own) | 50 to 100 feet |
| Neighbor's well | 100 feet |
| Property line | 10 to 25 feet |
| Foundation / basement | 10 to 20 feet |
| Surface water (streams, ponds) | 50 to 100 feet |
| Swimming pools | 15 to 25 feet |
These are floors, not targets. Your state or county code may be stricter. The site plan has to show every setback dimensioned to scale. Don't assume. Pull the actual code section for your jurisdiction.
The layout should also include a reserve area, a designated space equal to 100% of the primary field, kept undisturbed in case the primary field fails and needs replacement. Many states require this by statute. Don't park, pave, or plant trees on it.
What materials do you need to build a leach field?
The materials list for a conventional gravel-and-pipe system is shorter than most people expect. Quality matters at every point.
Perforated pipe is either 4-inch Schedule 40 PVC or SDR-35 PVC, both meeting ASTM standards. The perforations face down during installation. That's counterintuitive but correct: effluent drains out the bottom and sides more evenly. Pipe comes in 10-foot lengths. Some jurisdictions still allow perforated corrugated polyethylene (ADS pipe), but PVC is tougher and easier to camera-inspect later.
Drain rock (septic gravel) is washed, rounded, 3/4-inch to 1.5-inch crushed stone. You need 12 inches of gravel below the pipe and 2 inches above it. A 24-inch-wide, 100-foot trench at those depths takes roughly 4 to 5 cubic yards of stone. Use clean washed stone only. Dirty or crusher-run stone clogs the voids fast.
Geotextile filter fabric goes over the top of the gravel before backfill. It keeps native soil from migrating down into the gravel and plugging the drainage zone. Use a nonwoven geotextile rated for drainage, not landscape fabric from a garden center.
The distribution box (D-box) splits flow from the tank outlet evenly to each trench. A standard concrete or polyethylene D-box handles 2 to 8 outlets. It has to sit dead level. Even a slight tilt sends all the flow to one trench and starves the rest. That's one of the most common installation errors.
End caps go on the downstream end of each pipe run. Inspection ports (4-inch clean-out risers to grade) are required by most codes at the end of each run and at the D-box.
For a rough materials-only estimate, figure $800 to $2,500 for a mid-sized residential system, before excavation, delivery, or install labor [5].
How do you excavate and build the trenches correctly?
This is where DIY projects live or die. Excavation has to be precise enough that the system performs for 20 to 30 years.
Call 811 before any digging. It's the law and it's free. They mark underground utilities within a few business days of your call, typically 48 to 72 hours [9]. Don't skip it.
Trench depth depends on your design, but most conventional residential systems set the pipe 18 to 30 inches below finished grade. You want enough depth to protect the pipe from vehicles and frost heave while keeping the absorption zone above the seasonal high water table.
Excavate in dry or moderate soil. Never dig a saturated trench. The bucket smears and compacts the trench walls, which are your main absorption surface. Smeared walls can cut infiltration by half or more compared to properly scarified walls [6]. Hit a wet patch and stop; come back after a dry spell. Once dug, scarify (rake or loosen) the trench floor and sidewalls before adding gravel.
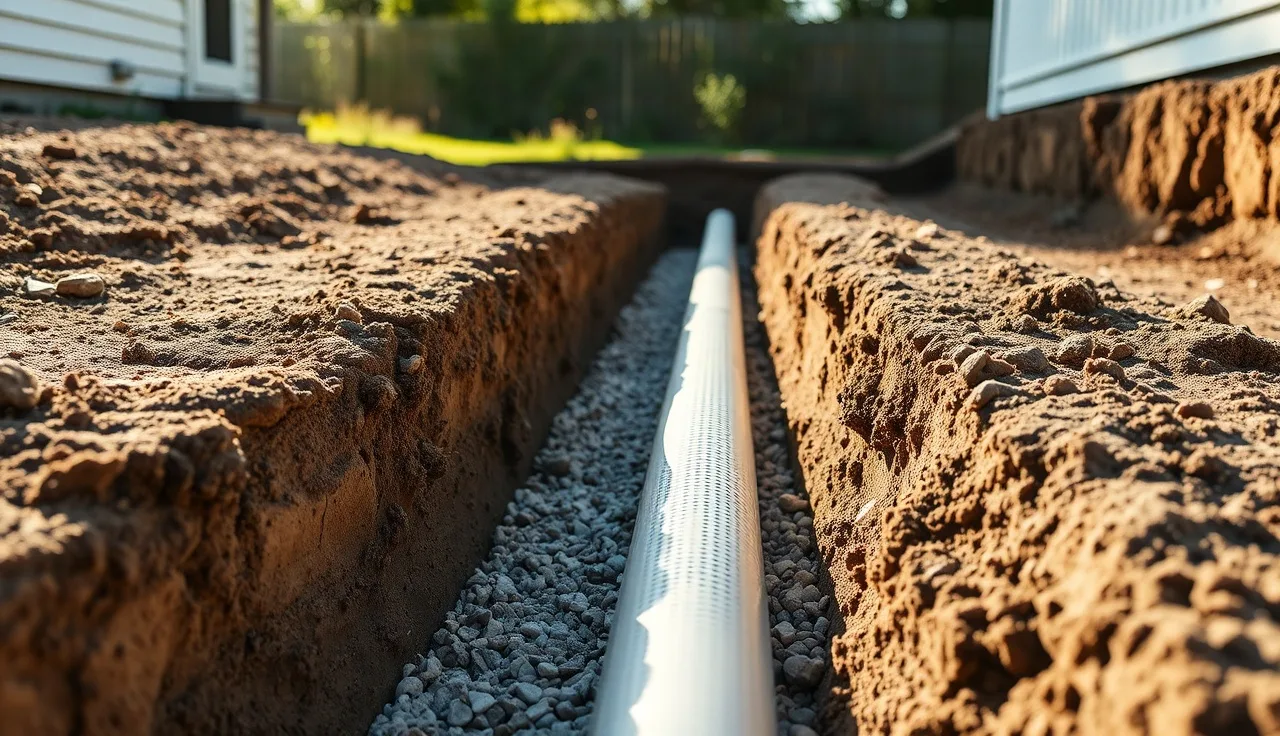
Add gravel in order. Place 12 inches of drain rock on the trench floor (measured to the top of the pipe). Set the perforated pipe, perforations down, level or on a slight downward slope (1/8 inch per foot is common; check your design). Add 2 inches of gravel over the pipe. Lay geotextile over the whole gravel bed, overlapping seams by at least 12 inches. Then backfill with native soil, mounded a little above grade to allow for settling.
Do not drive heavy equipment over the finished trenches. The gravel zone crushes permanently under load, and you'll wreck the field you just built. Mark the corners clearly so nobody drives on it during future landscaping or construction.
Be honest about the equipment. You need a mini-excavator (or a full-size one for deeper or longer trenches), a laser level or transit for pipe slope, and ideally a second person reading grades while you run the machine. Skip the plate compactor here; compacting the absorption zone is the last thing you want. Renting a mini-excavator runs $300 to $500 per day [5]. Mistakes in this phase cost far more than that to fix.
How do you install the distribution box and connect everything?
The distribution box is the nerve center of the field. Every trench takes its flow from here, and if the D-box is off, the whole field underperforms.
Set the D-box on a stable, level concrete pad or compacted gravel base. Level it with a torpedo level before you connect any pipe. The outlet inverts (the bottom of each outlet pipe) all have to sit at exactly the same elevation. A 1/4-inch difference biases flow. Some installers use adjustable outlet leveling devices inside the box. They're worth it.
The inlet pipe from the septic tank connects to the single inlet port. Effluent enters, splits across the outlets, and runs by gravity down each trench. The inlet invert has to sit at least 1 inch higher than the outlet inverts to prevent backflow.
Connect a solid (non-perforated) pipe from each D-box outlet to the start of each trench. That solid section runs until it reaches the gravel bed, where you switch to the perforated run. Keep the solid section as short as practical.
After every pipe connection is made and before you backfill anything, call for the inspection. The inspector typically checks D-box level and outlet elevation, pipe slope, gravel depth above and below the pipe, geotextile placement, setback compliance, and inspection ports. Some jurisdictions also check the D-box inlet elevation against the tank outlet. Photograph everything before you cover it.
For care after installation, see the guide on septic tank pumping. Keeping the tank maintained is the single biggest factor in how long the leach field lasts.
Can a homeowner build a leach field without a contractor?
Technically yes in many states. It's harder than it looks, and mistakes are expensive.
Many states let homeowners build their own septic systems on their own primary residence, as long as they pull the permit, pass the inspections, and follow the design exactly. Some states ban DIY septic work entirely and require a licensed contractor. A handful require a licensed professional to do at least the design even if the homeowner does the install. There's no single national rule. Check with your county health department or state environmental agency before you assume DIY is on the table.
Where it's legal, the real challenges are operating excavation equipment accurately, reading a grade and setting pipe slope, lifting and leveling a concrete D-box (they weigh 150 to 400 pounds), and timing the work around weather and inspector availability. You also have to haul in several tons of drain rock, which means a dump truck or multiple trailer loads.
The honest read: a motivated homeowner with construction experience can do this and save $3,000 to $8,000 in labor. A homeowner with no heavy equipment time who underestimates the grading precision will likely build a system that fails the inspection or fails early in service. If you're unsure, hire out the excavation and D-box work and do the pipe and gravel yourself. That split saves real money without betting the whole system on skills you haven't built yet.
For operators running multiple project sites, SepticMind helps coordinate inspection scheduling, permit tracking, and crew communication across jobs.
What does it cost to build a leach field?
Cost ranges are wide because site conditions drive the price as much as system size does.
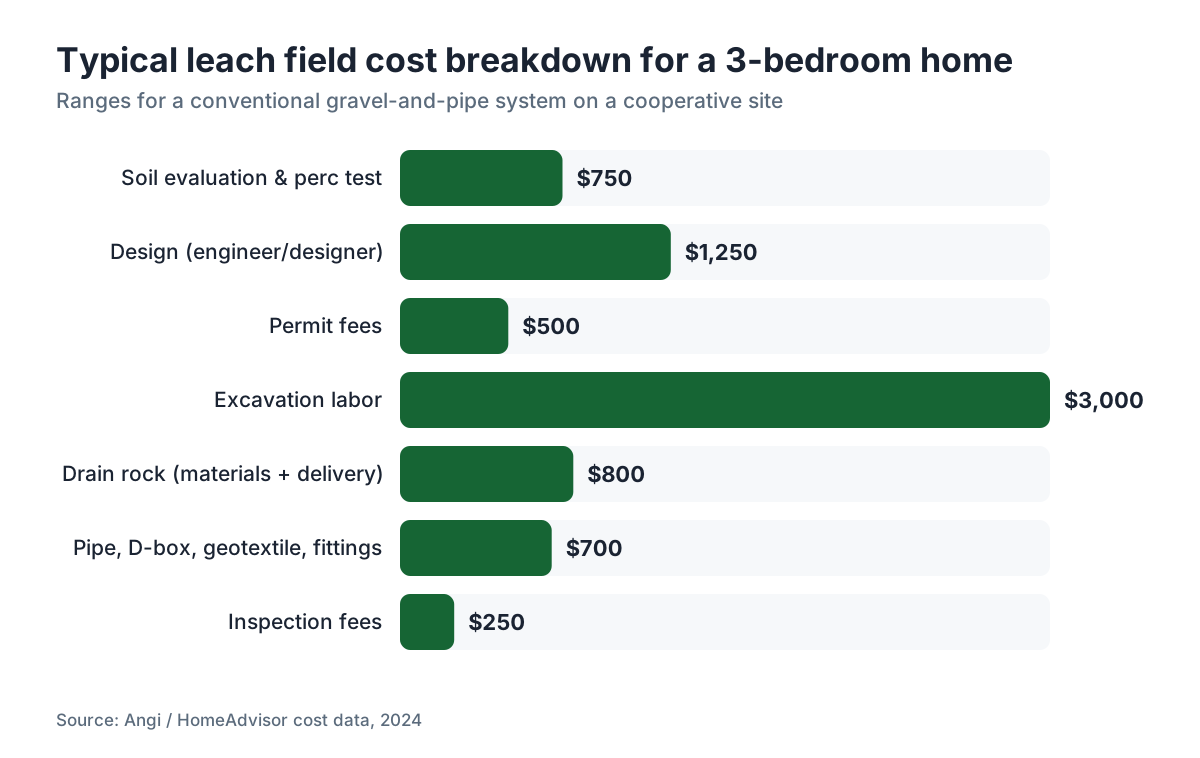
A conventional gravel-and-pipe system on a cooperative site (good soil, no rock, easy access) runs roughly $3,000 to $10,000 installed for a typical 3-bedroom home [5][7]. On a hard site, where rock needs blasting, where a mound is required for a shallow water table, or where long pipe runs reach the field, costs can hit $15,000 to $25,000 or more.
Here's roughly where the money goes:
| Cost component | Typical range |
|---|---|
| Soil evaluation and perc test | $300 to $1,200 |
| Design (engineer or designer) | $500 to $2,000 |
| Permit fees | $150 to $1,500 |
| Excavation labor | $1,500 to $5,000 |
| Drain rock (materials + delivery) | $400 to $1,200 |
| Pipe, D-box, geotextile, fittings | $400 to $1,000 |
| Inspection fees | $100 to $500 |
| Total (conventional system) | $3,000 to $15,000 |
If the field is part of a full new septic install including the tank, the combined cost climbs well past these numbers. The cost to put in a septic tank guide has current tank pricing to add on top.
Mound systems and alternative designs typically run 1.5 to 2.5 times the cost of a conventional field for the same house size [7]. That premium is real, but it's worth it when it's the difference between a legal system and one that keeps surfacing sewage in your yard.
What are the most common leach field installation mistakes?
These are the errors that show up over and over at inspections and in early failures. Knowing them beforehand is cheaper than learning them after.
Smearing the trench walls. This happens when you dig in wet conditions or drag the bucket along the walls. Smeared walls have far lower infiltration rates than rough, freshly opened soil. Dig dry and scarify the walls before adding gravel.
D-box not level. A 1/4-inch difference in outlet elevation dumps most of the flow into the lowest outlet and starves the rest. That trench saturates while the others stay dry. The overloaded one fails first, and the others never reach their design capacity.
Too little gravel below the pipe. Cutting gravel depth to save money shrinks the treatment zone and can leave the pipe sitting in fine soil where clogging happens fast. The 12-inch spec below the pipe is a minimum, not a suggestion.
Skipping the geotextile or using the wrong fabric. Fine soil migrates into the gravel over time without it. Garden-center landscape fabric doesn't have the right flow characteristics. Use rated drainage geotextile.
Wrong pipe orientation. Perforations face down. Up seems logical (fill the pipe, then overflow out the holes) but it distributes flow unevenly along the trench.
Driving over the field after installation. Compaction of the gravel zone is permanent. Mark the boundaries and keep every vehicle off.
No reserve area. Building a structure, a parking pad, or a garden over the reserve area costs homeowners dearly when the primary field finally needs replacing. The reserve area is not optional, even if you're sure you'll never need it.
Backfilling too fast after inspection. Once the inspector signs off, some crews rush the fill and shift pipe connections or geotextile. Hand-tamp around the pipe before you bring in mechanical help.
How long does a leach field last and how do you protect it?
A well-designed, well-installed leach field on suitable soil lasts 20 to 30 years before it needs serious attention, and some run 40 years or more [1][8]. The biggest variable is how well you maintain the tank upstream.
The EPA SepticSmart program says to "have your system inspected (in general) every 3 years by a professional and pump your tank as necessary, generally every 3 to 5 years" [1]. That advice exists because an under-pumped tank lets solids carry over into the field, where they clog the pore spaces in the gravel and soil. That's the most common cause of field failure, and it's almost entirely preventable.
A few other protective habits.
Keep trees and large shrubs at least 30 feet from the field. Root intrusion is slow but real. Grass is the ideal cover; it takes up water and keeps the field ventilated.
Divert surface water away from the field. Roof runoff, driveway drainage, and sump pump discharge should all go elsewhere. Saturated soil can't accept effluent.
Spread laundry across the week instead of running 10 loads on Saturday. Big hydraulic surges overload the field short term and, over years, push it toward early failure.
Go easy on the garbage disposal or skip it. It adds a lot of solids to the tank, shortens pumping intervals, and speeds up field loading.
Use water-efficient fixtures. Every gallon you don't send is a gallon the field doesn't process. Low-flow toilets and showerheads cut daily flow meaningfully.
If you think a system is struggling, the guide on septic tank inspection covers what inspectors look for and what signals a field in early distress. Catch it before effluent surfaces or backs up and you may get rehabilitation instead of full replacement.
What are the alternatives if your site fails the perc test?
A failed perc test doesn't mean no septic system. It means a conventional gravity field may not work, and you look at other approved treatment options.
Mound systems build a raised absorption bed above the natural soil using imported fill sand, which provides the treatment depth and separation you need above the water table or limiting layer. They work on many sites that fail for conventional fields. They cost more ($8,000 to $20,000 for the mound component alone) and eat more land, but they're proven technology with decades of performance data [7].
Drip irrigation systems dose small, frequent amounts of effluent to shallow trenches or emitters, which works on slow-perc sites that choke on one big hydraulic load. They need more mechanical parts (a pump, a timer, a filter) and more maintenance, but they widen the range of viable sites a lot.
Aerobic treatment units (ATUs) treat effluent to a higher standard before it hits the soil, which lowers the soil's treatment burden and allows smaller or shallower absorption areas. Many states permit ATUs on sites that wouldn't pass conventional requirements.
Pressure distribution systems use a pump to dose effluent to multiple field zones in rotation, resting each zone between doses. That rest lets aerobic conditions recover in the soil, which extends field life over continuous-flow gravity systems.
The right choice depends on your soil, lot size, topography, local code options, and budget. A licensed site evaluator who knows your state's code is the person to identify what's permitted on your ground. Don't copy your neighbor; the geology a hundred yards away can be completely different.
Frequently asked questions
How deep should leach field trenches be?
Most conventional leach field trenches place the perforated pipe 18 to 30 inches below finished grade. The exact depth follows your design, but you need at least 2 to 4 feet of separation between the trench bottom and the seasonal high water table. Frost depth matters in cold climates too; in northern states, 24 to 36 inches of cover over the pipe is common.
How much gravel do I need for a leach field?
Plan on 12 inches of drain rock below the pipe and 2 inches above it in each trench. For a standard 24-inch-wide trench, that's roughly 4 to 5 cubic yards of clean washed 3/4-inch to 1.5-inch stone per 100 linear feet. A typical residential system with 400 to 600 linear feet of trench needs 16 to 30 cubic yards delivered by dump truck.
How many linear feet of leach field do I need per bedroom?
A rough rule of thumb is 50 to 100 linear feet of trench per bedroom, but that's only a starting point. Actual sizing comes from dividing daily design flow (typically 100 to 150 gallons per bedroom) by the soil's long-term acceptance rate from your perc test. Slow-perc sites need much more footage. Always follow your state's sizing tables and your design engineer's math.
Can I build a leach field without a perc test?
No, not legally in most jurisdictions. The perc test or soil morphology evaluation is required to determine whether the site supports a septic system and how large the field must be. Skip it and build anyway and you're building without a permit, which means fines, possible demolition, and trouble selling. Some states accept a soil evaluation in place of a perc test; both are formal, permitted processes.
What is the minimum setback from a well to a leach field?
Most state codes require 50 to 100 feet between a leach field and a drinking water well on the same property, and 100 feet or more from a neighboring well. Some states set the minimum at 50 feet but push it to 100 feet near aquifer recharge zones or sensitive groundwater. Always look up the specific setback in your state's onsite wastewater code; it isn't uniform across the country.
How long does it take to build a leach field?
The physical construction of a conventional residential leach field usually takes one to three days of active work once permits are in hand and the excavator is on site. The full timeline is longer: soil testing takes a day but scheduling adds weeks, permit review runs two weeks to six months by jurisdiction, and inspections add a day or two. Budget four to eight weeks from start to finished backfill.
Can I put a leach field under a driveway or parking area?
No. Vehicle loads compact the gravel and crush the pipe, destroying the absorption zone. Even a short parking event on a new field can cause damage. The area above the field should be planted with grass and kept clear of all structures, pavement, vehicles, and heavy equipment permanently. Mark the boundaries after installation so future owners and contractors know where not to drive or dig.
What type of pipe is used in a leach field?
Most installs use 4-inch perforated PVC, either Schedule 40 or SDR-35, both meeting ASTM standards. Perforations face down during installation. Some codes also accept 4-inch perforated corrugated polyethylene pipe (ADS or similar). The solid inlet pipe from the distribution box to the start of each trench is typically 4-inch solid PVC. Check your local code for approved materials before you buy.
How do you know if a leach field is failing?
The clearest signs are sewage backing up into the house, wet or spongy ground above the field (especially with a sewage smell), and unusually lush or bright green grass in stripes above the trenches. Slow drains throughout the house, rather than at just one fixture, can also mean field saturation. A septic tank inspection confirms whether the problem is in the tank or the field. Early detection saves money.
Does a leach field need to be pumped or cleaned?
The field itself doesn't get pumped, but the septic tank upstream absolutely does, and that's what keeps the field healthy. The EPA recommends pumping the tank every 3 to 5 years to keep solids from carrying over and clogging the gravel. Once solids enter the field in quantity, cleaning is difficult or impossible. See the guide on septic tank pumping for scheduling.
Can you repair a failing leach field, or does it always need full replacement?
Repair is sometimes possible. Hydro-jetting the distribution pipes, replacing the D-box, or building a secondary field in the reserve area can extend a troubled system's life. Aerobic treatment units installed upstream can also cut the loading on a stressed field. Full replacement is needed when the soil absorption zone is irreversibly clogged. The septic system repair guide covers the repair decision in detail.
What is a reserve area and is it required?
A reserve area is a designated part of the lot kept free of structures, pavement, or disturbance, so that if the primary field fails, a replacement can be built without a variance or new site evaluation. Most state codes require the reserve area to equal 100% of the primary field. It's a legal requirement in many jurisdictions, more than a suggestion. Never build on or pave the reserve area.
How far apart do leach field trenches need to be?
Most codes require at least 6 feet of undisturbed soil between trench sidewalls, and many specify 10 feet from centerline to centerline for a 24-inch-wide trench. Crowding trenches reduces the soil surface available for absorption and can make the zones merge hydraulically, which defeats the point of separate runs. Your design specifies the exact spacing; follow it precisely during excavation.
Sources
- U.S. EPA SepticSmart: Homeowner's Guide to Septic Systems: EPA describes the drain field as where 'wastewater is treated by the soil' and recommends inspection every 3 years and pumping every 3 to 5 years.
- U.S. EPA Office of Water: Onsite Wastewater Treatment Systems Manual (2002): Design standards for conventional trench systems including setback requirements, permit process, and soil evaluation procedures.
- U.S. EPA: Onsite Wastewater Treatment Systems Manual, soil evaluation and sizing chapter: Perc rates between 1 and 60 minutes per inch are suitable for conventional leach fields; minimum 2 to 4 feet separation from seasonal high water table required.
- Angi: Cost to Install a Septic System: Conventional leach field installed cost ranges from $3,000 to $10,000 for a typical residential system; excavation rental $300 to $500 per day.
- NC State Extension: Soils and Onsite Wastewater section: Smearing trench walls during wet excavation can reduce infiltration rates by 50% or more compared to properly scarified walls.
- Penn State Extension: Mound Systems for Onsite Wastewater: Mound systems cost 1.5 to 2.5 times more than conventional fields and are a proven alternative for sites with limiting soil conditions.
- National Environmental Services Center at West Virginia University: Properly designed and maintained conventional leach fields typically last 20 to 30 years; some last 40 years or more depending on soil conditions and maintenance.
- Call811: Call Before You Dig: Federal requirement to call 811 before excavation to have underground utilities marked; utilities typically marked within 48 to 72 hours.
Last updated 2026-07-09