Septic drain field diagram: every component explained
By the SepticMind Editorial Team
TL;DR
- A septic drain field (also called a leach field) takes clarified wastewater from the tank and spreads it through perforated pipes into gravel trenches, where soil bacteria finish the treatment.
- Reading the diagram, from tank outlet to distribution box to laterals, helps you catch problems early and dodge a full replacement that runs $5,000 to $20,000.
What does a septic drain field diagram actually show?
A septic drain field diagram is a cross-sectional map of the whole underground treatment train behind your house. It starts at the septic tank, follows the effluent pipe to a distribution box or manifold, then fans out into a set of parallel perforated pipes called laterals, all buried in gravel-filled trenches. Below the gravel sits native soil. That soil is where the real treatment happens.
The diagram shows at least five distinct zones: the tank itself, the outlet baffle, the effluent line (sometimes called the force main if a pump is involved), the distribution box (D-box), and the lateral field. Some systems add a pump chamber between the tank and the D-box. Conventional gravity systems look like a simple ladder on paper. Pressure-dosed systems look almost identical, except an arrow shows effluent being pumped in timed doses instead of flowing on its own.
Why does the diagram matter? Every failure mode maps back to a specific component. Wet spots over the laterals usually mean the soil is saturated or the laterals are crushed. Sewage backing into the house usually means a blocked outlet baffle or a failed D-box. The diagram is your diagnostic map, not a pretty schematic.
What are all the parts of a septic system and drain field?
Here is every component you'll see in a full septic tank and drain field diagram, in the order wastewater hits each one.
Septic tank. A buried watertight container, usually 1,000 to 1,500 gallons for a home, that separates solids from liquid. Sludge sinks to the bottom, grease and lighter stuff floats as scum, and clarified liquid (effluent) occupies the middle zone. The tank doesn't treat waste. It just separates it [1].
Inlet baffle. A concrete, plastic, or sanitary tee fitting inside the tank at the inlet pipe. It deflects incoming waste downward so solids don't push scum toward the outlet.
Outlet baffle or effluent filter. On the outlet side, this stops floating scum and suspended solids from leaving the tank and clogging the drain field. Effluent filters (also called outlet filters) are the cheapest insurance against early field failure you can buy. Clean them every 1 to 3 years during a routine septic tank pumping service.
Effluent line. A solid (non-perforated) pipe, usually 4-inch PVC, that carries clarified effluent from the tank outlet to the distribution device. It needs a minimum fall, usually 1/8 inch per foot, though many codes want 1/4 inch per foot [2].
Pump chamber (pressure-dosed systems only). A separate buried tank holding a submersible effluent pump and a float switch. The pump fires in timed doses and spreads effluent more evenly across all laterals than gravity can manage. Not every system has one.
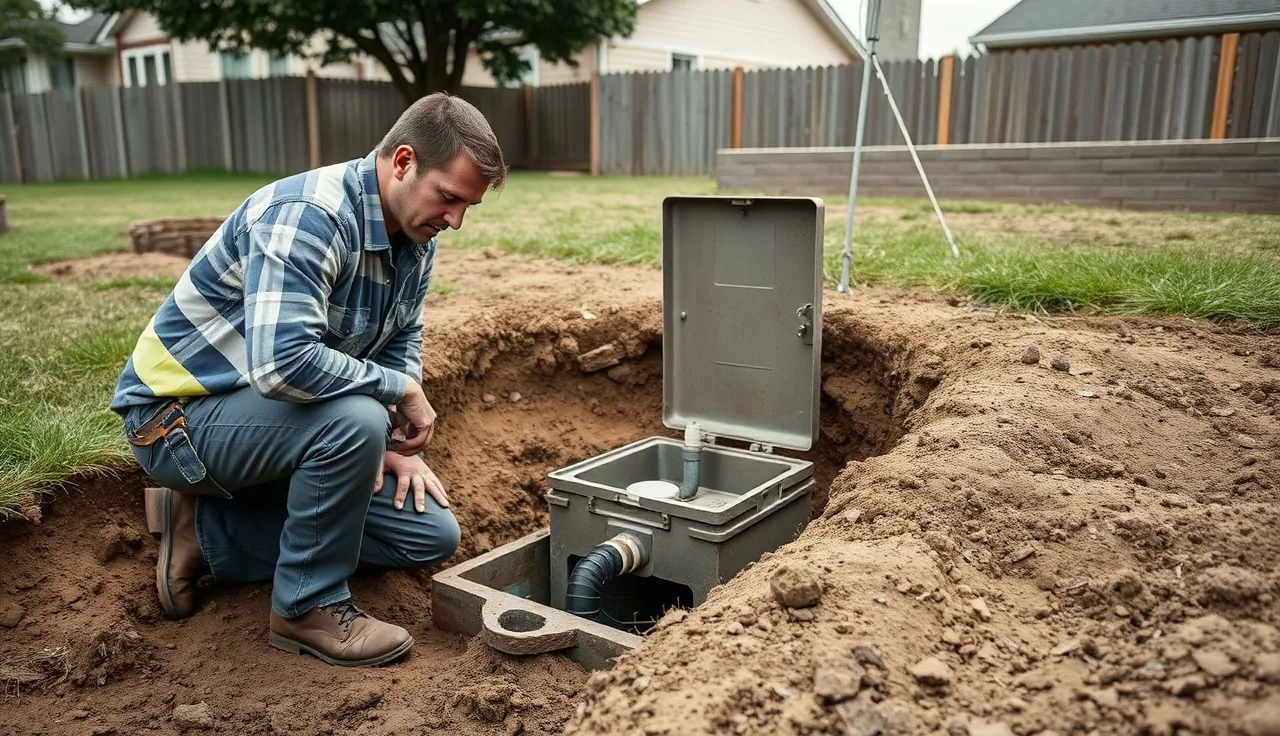
Distribution box (D-box). A small concrete or plastic box that takes effluent from the tank and splits it equally among the laterals. D-boxes fail often. They settle, tilt, or crack, and when they do, one lateral gets overloaded while others stay dry.
Lateral pipes. Perforated 4-inch PVC or corrugated flex pipe laid in gravel-filled trenches. Perforations face downward in most conventional installs so effluent drips into the gravel bed instead of pooling on top of the pipe.
Gravel aggregate bed. Clean, washed stone (usually 3/4-inch crushed rock) surrounds the lateral pipe. Gravel gives effluent a place to spread before it meets the soil, and it keeps the pipe from shifting.
Geotextile fabric. A permeable fabric layer over the gravel that keeps soil from working its way down and filling the void space. Not all older systems have it.
Native soil (treatment zone). The final treatment happens here. Aerobic and anaerobic bacteria in the top 12 to 36 inches of native soil destroy pathogens and eat nutrients before effluent reaches groundwater. This is the layer the entire system exists to protect [1].
Biomat layer. A thin black organic layer that forms at the gravel-soil interface in every working system. A thin biomat is normal and actually helps slow effluent so the soil has time to treat it. A thick, sealed biomat means overloading or chronic solids carryover from a neglected tank.
Inspection ports and cleanouts. Vertical risers from each lateral end and from the D-box that let a technician check distribution and flow without digging.
How does a septic tank and leach field diagram differ by system type?
Not all systems look the same on paper. The component names stay consistent, but the physical layout and treatment method shift a lot depending on soil, lot size, and local code.
| System type | Key diagram feature | Typical use case |
|---|---|---|
| Conventional gravity | Tank > effluent line > D-box > parallel laterals in gravel | Good native soil, adequate lot size |
| Pressure-dosed | Adds pump chamber between tank and field | Slow-draining soils, large fields |
| Chamber (Infiltrator) | Plastic arch chambers replace gravel | High water table, rocky soil |
| Mound system | Field raised above grade on imported sand | Shallow soil over bedrock or high water table |
| Aerobic treatment unit (ATU) | Pre-treatment tank aerates effluent before field | Poor soil, small lots, near surface water |
| Drip irrigation | Pressurized tubing distributes tiny doses | Very limited area, strict nutrient loading rules |
Conventional gravity is what most homeowners picture when they say "drain field diagram." A mound system diagram looks nothing like it: the field sits on a built-up sand mound, often 2 to 4 feet above natural grade, with the laterals running through the mound instead of into the ground.
Chamber systems swap the gravel bed for interlocking plastic arches. The plan view looks almost identical to a conventional system, but the cross-section shows open chambers instead of a gravel bed. The EPA accepts chamber systems as an alternative in its onsite wastewater guidance [12].
Not sure what you have? Pull your county permit records. The as-built drawing filed at installation is the most reliable septic tank and drain field diagram for your specific property. County health departments hold these records in most states.
What are standard drain field dimensions and how are they calculated?
Drain field size is not a guess. It comes straight from a soil perc test (percolation test) or a soil morphology evaluation, which measures how fast your native soil absorbs water. The result, in minutes per inch (MPI), feeds a formula that sets the required square footage of trench bottom.
The EPA's Onsite Wastewater Treatment Systems Manual gives sizing guidance: a single-family home generating 150 gallons per person per day needs somewhere between 300 and 900 square feet of effective absorption area, depending on soil type [1]. That range is real because perc rates swing hard, from 1 MPI in sandy loam to 60 MPI in clay. Most states won't permit a system at all if the perc rate tops 60 MPI.
Typical residential lateral trench dimensions:
- Trench width: 12 to 36 inches (varies by code; 24 inches is common)
- Gravel depth below pipe: 6 to 12 inches
- Cover depth from grade to top of gravel: 6 to 18 inches
- Trench length: 50 to 100 feet per lateral, with 3 to 6 laterals per system
- Spacing between trench centerlines: 6 to 10 feet
State codes govern all of these numbers. North Carolina's onsite wastewater rules, for example, set a minimum 6-foot centerline spacing and cap trench length before splitting to a new distribution point [3]. Your state's onsite wastewater code beats any general rule.
Some states now use a "loading rate" approach instead of perc testing alone, factoring in soil texture, structure, and restrictive horizon depth. The USDA Natural Resources Conservation Service soil survey for your county gives a preliminary read on whether your soil lands in a favorable or marginal category [4].
What does a failing drain field look like, and how do you diagnose it?
Drain field failure is one of the most misdiagnosed problems in home ownership, because the symptoms overlap with plumbing backups, tank problems, and D-box issues. Working through the diagram component by component is the fastest path to the real cause.
Common failure symptoms and their likely diagram location:
Slow drains or backups inside the house. This usually points to the tank (full of solids, outlet baffle collapsed) or a blocked effluent line, not the field itself. Get the tank pumped and inspected first before you assume the field is dead. See septic tank pumping and septic tank repair for that side of the diagnosis.
Wet, spongy soil or standing water over the lateral area. Classic saturated field. Could mean the biomat has gone anaerobic and sealed, the soil is at capacity from too much water use, the D-box is distributing unevenly, or tree roots have crushed the laterals.
Sewage odor outside but drains work fine. Often a cracked D-box or a broken lateral near the surface. Odor at the tank area is usually a riser lid or inlet baffle problem.
Greener-than-normal grass in a rectangular strip. The field is getting more effluent than it can fully absorb underground, and that nutrient-rich water feeds surface vegetation. Not an emergency, but a warning.
Diagnostic sequence a good technician follows:
- Check tank level and solids ratio. If solids exceed 1/3 of tank depth, pump it.
- Inspect the outlet baffle and effluent filter for blockage.
- Find and open the D-box. Look at water depth: all laterals should show equal low water, not one full and others dry.
- Use a snake or camera to check lateral condition if the D-box shows abnormal distribution.
- Probe the soil over laterals with a rod for hydraulic saturation.
The EPA SepticSmart program states that "the most common cause of system failure is the overloading of the soil absorption area with too much water" [1]. Conservation and tank maintenance prevent more field failures than any repair technique does.
Can a failing drain field be fixed, or does it always need replacement?
This is where homeowners get the most conflicting advice, and honestly, the answer depends heavily on how long the field has been failing and why.
Caught early, with the cause being a thick biomat from solids carryover (a poorly maintained tank), you have real options. Resting the field for 3 to 12 months while routing effluent elsewhere gives the biomat time to decompose aerobically. Some technicians inject hydrogen peroxide or use air injection (Terralift or similar equipment) to fracture the biomat and re-oxygenate the trench. Independent research on these methods shows mixed results. Purdue Extension reviewed several biomat remediation approaches and found rest periods and aerobic bacteria products showed some benefit, but results were inconsistent across soil types [5].
If laterals are crushed by root intrusion or vehicle traffic, the fix is excavation and pipe replacement. That's a targeted repair, not a full replacement, and it costs far less. See septic system repair for a breakdown of repair options and typical costs.
If the native soil itself is the problem, meaning it was marginal at installation and has now biologically sealed, there may be no way to rehab the existing footprint. Now you're looking at expanding the field into an unused part of the lot or installing a whole new system.
For a full replacement, budget $5,000 to $20,000 depending on system type, soil, and local labor [6]. A conventional gravity replacement on a suitable lot runs $5,000 to $12,000. A mound or ATU system on a difficult lot can hit $15,000 to $20,000 or more. The cost to install a septic system article has detailed regional breakdowns.
Operators managing multiple service accounts often use software like SepticMind to flag accounts with a history of high solids and schedule pre-emptive tank maintenance before field saturation becomes an issue. Catching it at the tank pumping stage always beats a field repair call on cost.
One honest caveat: nobody has great nationwide data on the success rates of biomat remediation. The closest published work comes from university extension programs in the Southeast and Midwest, and they tend to report 40 to 60 percent improvement in hydraulic function for rested systems with manageable underlying causes. Those numbers don't hold for fields that have been failing for years.
What should you never put over or near your drain field?
The diagram shows you the underground layout, but the surface zone matters just as much for keeping the system alive.
No vehicles. Even a single pass by a pickup truck can crush lateral pipes or compact the gravel bed, cutting absorption area for good. If vehicles routinely cross your field, you probably already have crushed laterals and don't know it yet.
No deep-rooted trees or shrubs. Willows, maples, and poplars send roots 30 to 50 feet sideways hunting for water. Plant only shallow-rooted grass or native ground cover over and around the field. University of Minnesota Extension recommends keeping trees at least 50 feet from the field edge [7].
No impermeable surfaces. Concrete patios, asphalt driveways, and even thick plastic tarps over the field block oxygen exchange and evapotranspiration, both of which the treatment process needs.
No garden irrigation. Adding water to an already-loaded soil column pushes it toward saturation. Keep sprinkler heads away from the field footprint.
No heavy lawn fertilization. The field already gets nutrient-rich effluent. Extra nitrogen from lawn fertilizer can overwhelm the soil's denitrification capacity and leach to groundwater.
The EPA's SepticSmart homeowner guide lists these same restrictions and adds one more: do not divert roof drains, sump pumps, or surface runoff toward the drain field [11]. Stormwater saturates the soil just as well as effluent overloading, and it needs no permit to do the damage.
How do you find your drain field if you don't have a diagram?
Most homeowners don't inherit a site plan from the previous owner. That's frustratingly common, and it creates real problems when something goes wrong or when you want to plant a tree.
Start with the county. In most U.S. states, the health department or environmental services office holds the original permit application and as-built drawing for every permitted septic system. These are public records in nearly every state. Call the county health department with your parcel address and ask for the on-site sewage disposal permit file. About 70 percent of the time, there's a diagram on file.
When county records are missing (common for systems installed before the 1970s), a licensed septic inspector can locate the system using probe rods, a metal detector for cast iron components, or a camera with a sonde transmitter that broadcasts a signal from inside the pipe. The inspector walks the yard with a receiver and marks the pipe path. A septic tank inspection that includes locating the field usually costs $200 to $600.
Look for visual clues too: a rectangular area of greener or faster-growing grass in dry summers (the field is releasing moisture), softer soil in a geometric pattern, or a cleanout riser cap peeking above the ground. The field is always downhill from the tank on gravity systems, usually set back from the house, and away from the well if there is one. Minimum well-to-field setbacks run 50 to 100 feet depending on state code [2].
Once you locate the field, draw your own diagram and save it. Photograph the location relative to permanent reference points: the corner of the house, a fence post, the well cap. That sketch will save you or the next owner real money.
What do drain field inspection and maintenance actually involve?
Regular maintenance is the single most effective thing a homeowner can do to extend field life. The EPA recommends inspecting the whole system every 3 years at minimum and pumping the tank every 3 to 5 years for a typical 3-bedroom home [1].
A thorough field inspection includes:
- Pumping the tank and measuring sludge and scum layers to confirm solids aren't reaching the outlet
- Removing and cleaning the effluent filter if one is installed
- Opening and leveling the D-box, checking that all lateral inlets sit at equal height and no single lateral is preferentially loaded
- Probing the soil over each lateral for signs of hydraulic saturation
- Checking cleanout risers for evidence of surfacing effluent
- Scanning the ground surface for wet spots, odors, or unusually green vegetation
The how often to pump septic tank guide covers pumping frequency in more depth. The short version: every 3 to 5 years for a standard household, more often if you have a garbage disposal, a large family, or a smaller tank. Garbage disposals alone can increase tank solids loading by 50 percent, per EPA guidance [1].
Water conservation counts as maintenance too. The field has a daily hydraulic capacity set by the original perc test. A household that keeps blowing past that capacity through back-to-back laundry loads, long showers, or leaking toilets is slowly drowning the field. A running toilet can waste 200 gallons a day, which is roughly the entire design daily flow for a two-person household. Fix the flapper.
What are the real costs of drain field repair versus replacement?
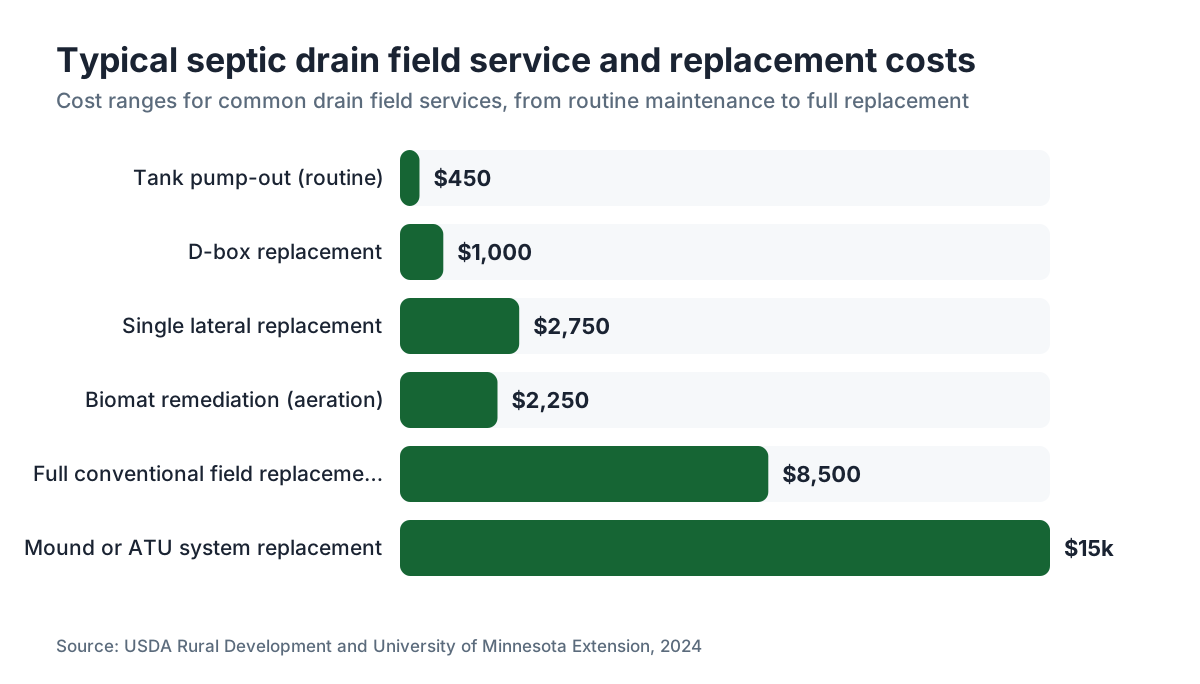
The numbers here have wide ranges, and that's honest: regional labor, soil conditions, permit fees, and system type all move the final figure a lot.
| Service | Typical cost range | Notes |
|---|---|---|
| Tank pump-out | $300 to $600 | Every 3 to 5 years, protects the field |
| Effluent filter cleaning | $0 to $75 | Often included in pump-out |
| D-box replacement | $500 to $1,500 | Parts plus labor plus minor excavation |
| Single lateral replacement | $1,500 to $4,000 | Depends on depth and pipe length |
| Full lateral field replacement | $5,000 to $12,000 | Conventional system on suitable soil |
| Mound system replacement | $10,000 to $20,000 | Difficult soil or high water table |
| ATU installation | $10,000 to $20,000+ | Adds electrical and service contract costs |
| Biomat remediation (aeration) | $1,000 to $3,500 | Variable results, worth trying before full replacement |
These ranges line up with figures cited by USDA Rural Development and state extension programs [6][8]. The cost to put in a septic tank article covers the tank-side costs if you're facing a full system rebuild.
One thing both operators and homeowners underestimate: permit fees for a new field or major repair can run $300 to $2,000 depending on state and county. Some counties also require a new perc test before issuing a repair permit, which adds $200 to $500 and several weeks to the timeline.
The math almost always favors prevention. A $400 pump-out every four years over 20 years costs $2,000. A premature field failure from neglect costs $5,000 to $20,000. That's not a close comparison.
What regulations govern drain field design and setbacks?
Drain field design is regulated mostly at the state level, not federally. The EPA sets guidance through documents like the Onsite Wastewater Treatment Systems Manual and the SepticSmart program, but it doesn't directly regulate individual system design in most states [1]. Each state's department of health or environmental quality publishes its own onsite wastewater code.
The Clean Water Act (33 U.S.C. § 1251 et seq.) provides the federal umbrella, but enforcement and permitting authority flows to states through the National Pollution Discharge Elimination System (NPDES) and, for onsite systems, through state primacy [9].
Common setback minimums that show up across most state codes (check your specific state for exact numbers):
- Property line: 5 to 10 feet minimum
- Drinking water well: 50 to 100 feet minimum
- Surface water (streams, ponds): 25 to 100 feet minimum
- Foundation walls: 10 to 20 feet minimum
- Potable water supply lines: 10 feet minimum
North Carolina's onsite wastewater rules (15A NCAC 18E) show what a detailed state code looks like: trench dimensions, loading rates by soil class, setbacks, and required inspection stages at permit, installation, and final cover [3]. Florida's Chapter 64E-6 FAC is another example of a detailed state code that goes past EPA guidance in prescribing system components [10].
Some counties stack extra restrictions on top of state minimums, especially in areas with sensitive aquifers or dense development. Always pull the local code before designing, repairing, or expanding a system. What's allowed in rural Montana is not necessarily allowed in a suburban Florida county.
Operators who manage permitted work across multiple jurisdictions often use dispatch and documentation software to track permit status and setback compliance by address. SepticMind is one tool built for exactly that multi-jurisdiction workflow, connecting field technicians to permit records and service history in real time.
How do you read and use a septic system site plan or permit drawing?
Pull your permit file from the county and you'll typically find one of two drawing types: a schematic (not to scale, showing component relationships) or a site plan (drawn to scale, showing exact dimensions and distances to property lines, wells, and structures). The site plan is far more useful for actually locating the field in your yard.
Key elements to find on the drawing:
North arrow. Orient the drawing to your property. Stand at the back door and compare the drawing's building footprint to what you see.
Tank location. Shown as a rectangle with inlet and outlet marked. Dimensions and setbacks from the house foundation should be labeled.
Effluent line. A single solid line from the tank to the D-box, with a slope notation (fall per foot).
D-box location. A small square. This is your first excavation target when troubleshooting.
Lateral field outline. Parallel dashed or solid lines showing each lateral run. Spacing and total length should be labeled. Lateral count times length times effective trench width gives you total absorption area.
Setback dimensions. Distances to the well, property lines, and any surface water. These tell you how much room, if any, exists for an expansion field.
Soil evaluation notes. Many drawings include the perc test results and soil class in a data block, which tells you the original design loading rate.
If the drawing is old and hand-drawn, treat the measurements as approximate. Systems were often installed slightly off the permitted drawing, and a probe rod check is still worth doing before you commit to any excavation. The drawing is a starting point, not a guarantee.
Frequently asked questions
What is the difference between a drain field and a leach field?
They are the same thing. The terms are interchangeable. "Drain field" is the more common term in Northern states and in EPA documentation; "leach field" is widely used in the South and West. Both refer to the system of perforated pipes in gravel trenches that distribute and treat effluent from the septic tank in native soil. A septic leach field diagram and a drain field diagram show identical components.
How deep are septic drain field pipes buried?
Lateral pipes usually sit 6 to 18 inches below grade, with 6 to 12 inches of gravel beneath the pipe. Total trench depth from ground surface to trench bottom is usually 18 to 36 inches. In cold climates, codes often require deeper installation to protect pipes from freeze damage. The exact requirement is in your state's onsite wastewater code and should be on the original permit drawing.
Can I add a second drain field if the first one fails?
Yes, if your lot has suitable, unused soil area that meets setback requirements. Most system designs reserve a "repair area" of equal size to the primary field for exactly this purpose. A perc test or soil evaluation of the new area is required before permitting. If no suitable reserve area exists, you may need an alternative system type like a mound or ATU that can treat effluent in a smaller footprint.
How long does a drain field last?
A well-maintained conventional drain field on suitable soil usually lasts 20 to 30 years, and many exceed 40 years. The biggest predictors of shorter life are neglected tank pumping (solids carry over and clog the field), hydraulic overloading from high water use, and root intrusion. Systems on marginal soils or installed without proper design often fail in 10 to 15 years regardless of maintenance.
What happens to a drain field in heavy rain?
Heavy or prolonged rain saturates the soil around the lateral trenches, cutting the soil's ability to absorb effluent. This causes temporary hydraulic overload: effluent backs up in the trenches, sometimes surfacing. In most cases the system recovers within a few days once soils dry. Repeated flooding suggests the field is undersized, poorly sited, or that surface drainage is directing runoff into the field, which regrading can often correct.
Do I need a permit to repair or replace a drain field?
In almost every U.S. state, yes. Any repair that involves opening the field, replacing lateral pipe, installing a new D-box, or expanding the absorption area needs a permit from the county health or environmental department. Installing without a permit creates liability at resale and can result in fines. Some states allow minor repairs like D-box leveling without a full permit; call your local health department before any excavation.
What is a distribution box and why does it fail?
A distribution box (D-box) is a small concrete or plastic junction box that splits effluent equally among all lateral pipes. It fails mostly by settling or tilting: even a quarter-inch tilt sends one lateral most of the flow while others stay dry. A tilted D-box can cause premature failure of one lateral zone while the rest of the field stays healthy. Resetting or replacing a D-box costs $500 to $1,500, far cheaper than field replacement.
How much gravel does a septic drain field use?
A typical residential system uses 15 to 40 tons of 3/4-inch washed crushed stone, depending on field size. Each trench needs gravel to a depth of 6 to 12 inches below the lateral pipe and 2 inches above it before the geotextile fabric and soil cover. Most contractors order gravel by the ton from a local quarry; expect $15 to $40 per ton for the material itself, not counting delivery or installation labor.
Can tree roots really destroy a drain field?
Yes, and faster than most homeowners expect. Willow, poplar, maple, and elm roots can travel 30 to 50 feet sideways seeking moisture. Once roots enter a perforated lateral, they form dense mats that block flow and eventually crush the pipe. Root damage often requires excavation and pipe replacement for affected laterals. Prevention is simple: keep trees at least 30 to 50 feet from the field edge, with willows and poplars at the greater distance.
What is a biomat and is it always a problem?
A biomat is a thin layer of organic material and bacteria that forms at the gravel-soil interface of any working drain field. It's normal and actually helpful at moderate thickness because it slows effluent movement and improves treatment contact time. It becomes a problem when it grows thick and anaerobic, forming a seal that blocks absorption. Thick biomats come from excess solids entering the field, usually from an infrequently pumped tank.
How do I know if my D-box is distributing effluent evenly?
Open the D-box lid (usually a concrete or plastic lid set just below or at grade, reachable by shovel). All lateral outlets should sit at exactly the same height and show similar water levels. If one pipe is submerged and others look dry, the box has tilted or one lateral is blocked. A licensed inspector can also run a dye test: add non-toxic septic dye to a toilet, then check the D-box to confirm flow reaches all outlets within 24 hours.
Does a garbage disposal affect the drain field?
Yes, a lot. A garbage disposal adds food solids to the tank, increasing sludge buildup and the risk of solids carryover to the field. The EPA notes that garbage disposals can nearly double the rate of tank solids accumulation [1]. If you use one, pump the tank every 2 to 3 years instead of 4 to 5, and make sure you have a working effluent filter on the tank outlet. Some installers recommend skipping garbage disposals on septic entirely.
What is a chamber system and how does its drain field diagram differ?
A chamber system replaces the gravel aggregate with interlocking plastic arch-shaped chambers (brands include Infiltrator and others). The lateral pipe runs through the open chamber, and effluent flows directly from the chamber onto native soil. The plan-view diagram looks nearly identical to a conventional field. The cross-section shows open plastic arches instead of a gravel bed. Chamber systems are accepted by the EPA and most state codes, and they're often used where gravel is expensive or soil permeability is moderate.
Sources
- U.S. EPA, Onsite Wastewater Treatment Systems Manual (EPA/625/R-00/008) and SepticSmart homeowner guidance: EPA describes conventional drain field components, biomat formation, loading rate guidance, and notes that garbage disposals increase tank solids accumulation; quotes 'the most common cause of system failure is the overloading of the soil absorption area with too much water'
- U.S. EPA, Onsite Wastewater Treatment Systems Manual, effluent pipe slope and setback guidance: Effluent lines require a minimum fall of 1/8 to 1/4 inch per foot; well-to-field setbacks range from 50 to 100 feet depending on state code
- North Carolina Department of Health and Human Services, Onsite Wastewater rules (15A NCAC 18E): North Carolina onsite wastewater rules specify minimum 6-foot centerline spacing, trench dimensions, loading rates by soil class, setbacks, and inspection stages
- Purdue University Extension, Septic System Maintenance and Biomat Remediation guidance: Purdue Extension review of biomat remediation approaches found rest periods and aerobic bacteria products showed some benefit but results were inconsistent across soil types
- USDA Rural Development, Onsite Wastewater Treatment Systems cost and sizing guidance: Conventional field replacement costs $5,000 to $12,000; mound and ATU systems range $10,000 to $20,000 or more depending on soil and local labor
- University of Minnesota Extension, Septic System Owner's Guide, tree and plant setbacks: University of Minnesota Extension recommends keeping trees at least 50 feet from the drain field edge to prevent root intrusion
- University of Minnesota Extension, Septic System Costs and Maintenance overview: D-box replacement typically costs $500 to $1,500; routine tank pump-out costs $300 to $600 every 3 to 5 years
- U.S. EPA, Summary of the Clean Water Act (33 U.S.C. § 1251): The Clean Water Act provides federal authority over water pollution; onsite wastewater permitting authority flows to states through NPDES primacy
- Florida Department of Health, Chapter 64E-6 Florida Administrative Code, Onsite Sewage Treatment and Disposal Systems: Florida Chapter 64E-6 FAC provides a detailed state code governing component specifications, setbacks, and permitting requirements for onsite systems, exceeding EPA guidance in specificity
- U.S. EPA, SepticSmart guidance for homeowners: EPA SepticSmart homeowner guidance states do not divert roof drains, sump pumps, or surface runoff toward the drain field, and lists surface and vehicle restrictions
- U.S. EPA, Types of Septic Systems overview including chamber and alternative systems: EPA acknowledges chamber systems as an accepted alternative to conventional gravel-trench systems in onsite wastewater guidance
Last updated 2026-07-09